


This tutorial will be based on creating a partition in Windows Seven. I have seen so many people attempt to do this themselves without guidance. Ultimately, they end up with a corrupt system. The aim of this tutorial is to make sure you don't corrupt your system.
What does the word "partition" mean? The computer must have a hard-drive to function, and within that hard-drive you can create sections, which is where the word "partition" comes from. However, partitions are not installed physically—sections can be created using what's called the Disk Management tool, which can be found within Administrative Tools.
When you buy a computer from a store, chances are it came with the C: Drive (partition) already set. To navigate the C: Drive:
- Go to Start -> Computer
- Locate the hard drive with the letter C.
- Double click it.
This is where all your computer programs will be installed. Be careful when changing or deleting programs in that drive. Feel free to install a portable software called Glary Utilities, which will have an option to remove empty folders from within the drive.
The first thing we should do is create a back-up in case something goes wrong. It is better to be prepared and have all your documents backed up. Feel free to use an external hard-drive and copy all your important material. Otherwise, follow this navigation:
- Control panel -> System and Security -> Backup and Restore
- Select something like "Create System Image".
- Should something go wrong, in the backup and restore click on "Recover system settings or your computer".
Creating the Partition
The first thing we need to do is type "computer management" into the search box and press enter. Then click on Disk Management. The management should look like this:
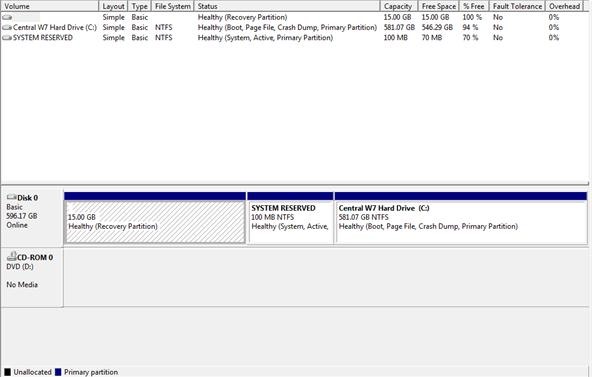
Notice the 15.00GB? That is the recovery partition and what is used when the computer crashes— do not delete or amend this drive in any way.
So here's what we do. First, note that we have no free space on the computer to create a new partition. But notice how the C: drive is 94% free? We are going to take 15GB from that partition so we can use that extra space to create a new drive.
To do this, right click on (C:) and select shrink volume. You should now see this window come up on your screen:
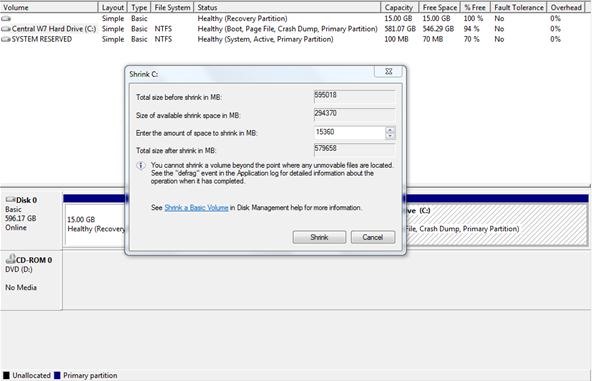
For 15GB, we must enter 15360MB into the column that says: "Enter the amount of space to shrink in MB". Remember there is 1024MB in every GB. Don't like math? I'll be nice. Check out this small MB to GB converter. When you have selected the amount you want to shrink, press the shrink button.
The screen should look like this:
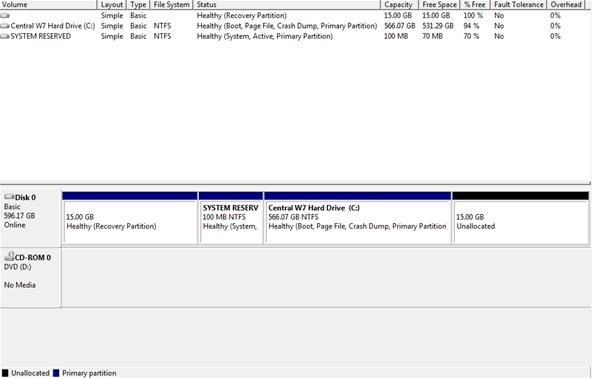
Now we have the 15.00GB, but it is unallocated, meaning you cannot write to it at all. What we need to do now is assign it a drive. Right click on the unallocated space, then click on "create new simple volume". The wizard will now pop-up and guide you to making a new hard-drive. Just make sure you choose NTFS. Now that we have a new partition (or section, drive, volume) within our hard-drive, let's check it out.

Now that I have both (C:) and (B:) drive on my computer, double clicking on (B:) volume will come up with blank space waiting to be used. You could also use an alternative partition manager such as Partition Magic.
Well that is the end of my tutorial. Hope you liked it and learned something new! :-)
Just updated your iPhone? You'll find new emoji, enhanced security, podcast transcripts, Apple Cash virtual numbers, and other useful features. There are even new additions hidden within Safari. Find out what's new and changed on your iPhone with the iOS 17.4 update.


Be the First to Comment
Share Your Thoughts